
A transition is the moment between two photos—how one gives way to the next. It lasts somewhere between half a second and two, it’s the part of a slideshow nobody consciously watches, and it does more to make a slideshow feel finished than almost anything else you can change.
Without transitions, a slideshow is a sequence of hard cuts: one photo vanishes, another appears. On a fixed timer it reads as a folder of images being clicked through. With transitions, the photos flow into each other, and the whole thing starts to feel like something that was made rather than merely assembled. (The one place a hard cut is the craft is when it lands on the music—more on that below.)
SlideFlow gives you a full catalog of transitions on Mac, iPhone, and iPad—and, as with filters, you don’t choose one. You choose a set, and SlideFlow varies among them as the slideshow plays. The set belongs to the slideshow rather than to the app, so it travels to your other devices with it. And you needn’t choose at all: a slideshow style picks a set that fits its mood, and this guide is for when you want to know what’s in it, or to make your own.
Why transitions matter more than they look like they should
Cutting straight from one photo to another is jarring in a way that’s easy to miss when you’re the one who chose the photos. You already know what’s coming next. Your audience doesn’t, and every hard cut asks them to reorient: new scene, new light, new subject, no warning.
A transition buys a moment—long enough for the eye to let go of one image before the next one arrives, short enough that nobody is waiting on it. The result feels calm rather than abrupt. That’s why the crossfade has survived unchanged since the era of two slide projectors and a dimmer—it isn’t a decoration, it’s a courtesy to the viewer.
The more elaborate transitions do something different. A wipe is visible: it draws attention to itself and announces that a change is happening. Used occasionally that’s energy; used on every single photo it’s noise. Most of the craft in choosing transitions is deciding how much of each you want.
Every transition in SlideFlow
The full catalog lives in the slideshow settings:
- Open a slideshow.
- Open the slideshow settings with the Customize button, or from the toolbar menu.
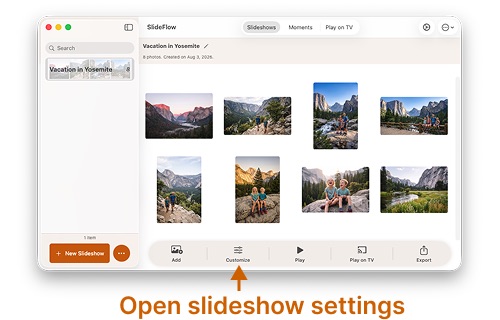
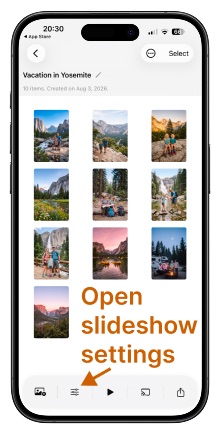

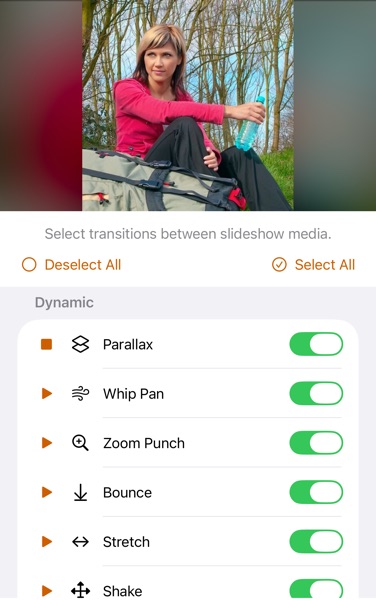
- Open Show all settings if the screen shows only Style and Music, then click or tap Slide transitions in the Transitions section.
- Switch on the ones you want. Each transition has a play button next to it, so you can watch it in the preview area at the top of the screen rather than judging it by name.
- Play the slideshow. SlideFlow generates it on the fly, so you see the result within seconds and can go straight back and change your mind.
The steps are the same on Mac, iPhone, and iPad.
What you’ll find there is thirty-four transitions, organized into seven families so that related effects sit together. They range from effects nobody will consciously notice to ones that are unmistakably an effect. That range is the point—it’s what lets the same catalog serve a memorial slideshow and a birthday party. Here are all seven families, in the order you’ll find them on screen.
Dissolve
The quiet family, and the one to reach for when in doubt. Both photos are visible at once while one becomes the other, so nothing moves and nothing draws attention to itself.
- Cross Dissolve — one photo fades directly into the next. The classic, and the most invisible transition there is. If you enable only one thing, enable this.
- Quick Dissolve — the same blend played in a fraction of the time, so fast it reads as a softened cut rather than a fade. It exists for fast-paced slideshows: between impact cuts at a three-second pace, a full two-second dissolve would smear the very moments the cuts are for, while a quick one keeps their tempo. The backbone of the Dramatic style.
- Cross Blur — the two photos blend through a soft focus, so the frame goes briefly dreamy before the new photo resolves sharp. More noticeable than a plain dissolve.
Wipe
The next photo is revealed behind a moving edge that travels across the frame. Both images stay put; only the boundary between them moves.
- Wipe Left, Wipe Right, Wipe Down, Wipe Up — the same effect in each of the four directions.
Wipes have a strong sense of direction, and you can use that deliberately. A consistent downward wipe through a set of photos reads as moving through a list; mixing all four directions feels more playful and less formal.
Slide
Similar to a wipe at a glance, but the difference is bigger than it looks: here both photos move. The new one enters from off-screen and pushes the old one out of the opposite side, the two travelling together like consecutive frames of a filmstrip being wound on.
- Slide Left — the new photo enters from the right and pushes the old one off to the left.
- Slide Right — the new photo enters from the left and pushes the old one off to the right.
- Slide Down — the new photo enters from above and pushes the old one off the bottom.
- Slide Up — the new photo enters from below and pushes the old one off the top.
That is what separates a slide from a wipe. A wipe holds the outgoing photo still and uncovers the new one over the top of it; a slide moves the whole picture along. Only the slide gives you a real sense of sequence and progress, which makes it a natural fit for photos taken in order—a walk, a journey, a series of steps.
The vertical pair is worth remembering whenever the frame is taller than it is wide: an iPhone held upright, an iPad in portrait, a tall SlideFlow window on a Mac, or a video exported vertically for TikTok, Reels or Shorts. In a tall frame the photos travel along the long axis, which reads more naturally than pushing them across the narrow one—and the horizontal pair does the same job in a widescreen frame.
Dynamic
Camera-style moves: the frame behaves less like a slideshow and more like something being filmed by a person. This is the family to raid when a slideshow needs energy.
- Parallax — the new photo slides in over the old one, which drifts away in the same direction at a fraction of the speed and dims as it recedes. The speed difference is what creates the illusion of depth, as though the old photo were further away.
- Whip Pan — a very fast push with a horizontal motion blur smearing the picture at the peak of the move, the way a camera looks when it’s swung hard between two subjects.
- Zoom Punch — the old photo lunges towards you while the new one drops in oversized and settles, as if the camera punched straight through one picture into the next.
- Bounce — the new photo drops in from above, lands, and settles with two dampened bounces.
- Stretch — a push where the incoming photo squashes and stretches as it moves and overshoots slightly before settling. Cartoon physics, in the best sense.
- Shake — the camera judders, the new photo slams in on the hardest jolt, and the shake dies down. An impact cut.
- Pendulum — the new photo swings in from off-screen on a long arm pivoted high above the frame, overshoots, and rocks to rest, like a photo on a rope dropping into place.
- Spin In — the incoming photo spins and grows out of the centre of the frame into place.
- Spin Out — the outgoing photo spins and shrinks away to nothing, revealing the next one behind it.
Spin Out is one no style enables, and for a reason worth knowing: a photo shrinking away to nothing carries a faint sense of “and that’s that”, and not everyone wants it recurring through a slideshow. That’s a matter of taste rather than a warning—if you like the punctuation it gives, it’s one switch away. And where that sense of an ending is exactly what you want, Spin Out is one of the choices for the ending transition, which plays once, on the last frame.
Effects
Stylized overlays and breakups. These are the boldest things SlideFlow does, and the ones to use most sparingly—but a single one of them among quieter transitions is a genuine moment.
- Glitch — the old photo breaks up, horizontal bands tearing sideways with a ghost copy flickering beside it, then the new one flashes in and out and settles with a last jolt, like a signal locking on.
- Light Beam — a warm streak of light sweeps across the frame while the photos blend, as though a light source passed over the lens.
- Film Burn — a hot orange glow flares out of the bottom-left corner and burns away again, like film melting in the projector gate.
- Flash — the frame blows out to white and the new photo is already there when the flash dies down. The quickest transition in the catalog, and the most abrupt.
- RGB Flash — a sharper, glitchier cousin of Flash: the old photo breaks into offset ghosts under red and cyan washes, a white spike hides the cut, and the new photo jolts into place.
- Bokeh — soft out-of-focus circles of warm light drift across the frame while the photos blend, like city lights behind an unfocused lens.
3D
The frame turns in perspective, as if the photos were printed on a solid object.
- Flip Horizontal — the frame turns over left to right, like a card being flipped.
- Flip Vertical — the same, turning top to bottom.
- Cube — the two photos sit on adjacent faces of a box that rotates a quarter turn to bring the new one forward.
Shapes
The new photo arrives through an opening rather than behind a straight edge.
- Circle Open — a circle expands from the centre, opening onto the next photo.
- Circle Close — the reverse: the current photo contracts into a closing circle.
- Doorway — the outgoing photo splits down the middle and its two halves slide apart to left and right, like doors opening, while the new photo grows into place behind them.
- Grid — the new photo arrives as a grid of tiles that pop into place one after another.
- Blinds — the new photo comes in through vertical slats that each open from their centre, sweeping left to right like venetian blinds turning.
Circle Close is the other transition no style enables. The iris-out has meant “this is the end” since the silent era, and that association is strong enough to be worth meeting on purpose rather than by surprise. Switch it on and it gives a slideshow an old-film rhythm that suits a light-hearted set better than you might expect. And for the place the iris-out actually belongs—the very end—it is one of the choices for the ending transition.
Every transition has its own tempo
Transitions don’t all run for the same length of time, because they don’t all work at the same speed. SlideFlow gives each one the pace it needs, in three tempos:
- 0.6 seconds — the impact cuts. Whip Pan, Zoom Punch, Stretch, Shake, Glitch, Flash and RGB Flash. Speed is the whole point of these: a whip pan given time to breathe is just a blurry slide, and a slow flash is a whiteout. Quick Dissolve keeps them company as the one quiet transition at this tempo—a blend fast enough to sit between punches without slowing them down.
- 1.5 seconds — ordinary movement. The wipes, the slides, the turns, the swings, the shaped reveals, and Light Beam—a travelling edge wants the tempo of a wipe rather than of a dissolve. Fast enough to stay lively, slow enough to follow.
- 2.0 seconds — the soft blends. Cross Dissolve, Cross Blur, Parallax, and the two overlays drawn over a plain dissolve, Film Burn and Bokeh. Unhurried by design.
This matters for two practical reasons. A slideshow of mostly dissolves runs noticeably longer than one of mostly impact cuts, so the transitions you pick affect the finished length. And it’s why the punchy effects don’t dominate as much as their numbers suggest—they’re on screen for less than a third as long as a dissolve.
If you only want a shortlist
Thirty-four is a lot to audition. The quickest shortcut is a style: each one enables a set that fits its mood, and you can thin it out from there. If you’d rather build your own:
- Cross Dissolve alone covers most needs and never looks wrong.
- Add Cross Blur and one or two Wipe directions for gentle variety.
- Add a Slide pair if your photos have a natural order—the horizontal one for a widescreen slideshow, the vertical one if you’ll be watching on a phone held upright or exporting for TikTok, Reels or Shorts.
- Add Parallax for a touch of depth that still reads as calm.
- Raid Dynamic and Effects only when the occasion is genuinely light-hearted—and take one or two, not the whole family.
You pick a set, not a single transition
This is the thing to understand before you start toggling switches. Slide transitions is not a single choice—every transition has its own switch, and SlideFlow varies among all the enabled ones as the slideshow plays.
That’s why the settings screen shows a count like 9 transitions rather than naming one. It’s telling you how many of the thirty-four are currently switched on, not which one is selected. What a new slideshow starts with is decided by its style: Happy, the default, enables a bright handful—dissolves, slides and wipes with a sparkle or two—while Relax and Romantic keep to soft blends, Dramatic to quick dissolves and punches, and Energetic and Happy Rhythm enable none at all, which the row shows as None and plays as a hard cut. Change the set by hand and the Style row reads Custom; the slideshow keeps your set.
So what you’re really choosing is a range:
- Many enabled gives variety, which keeps a long slideshow from feeling mechanical. It’s the right starting point for casual, personal slideshows you’ll play again and again.
- One or two enabled gives a consistent, restrained look. Cross Dissolve on its own is the classic answer, and it never competes with the photos.
- None enabled is a hard cut. It looks abrupt on a timer and sharp on the beat—so sharp that, with beat timing on, it can be the better choice. Energetic and Happy Rhythm use nothing else.
- Select All and Deselect All at the bottom of the screen let you start from either extreme instead of toggling thirty-four switches by hand. Each family header carries a button of its own too—reading Select All, or Deselect All once every transition in that family is on—which is the quickest way to take a whole group in or out: the six Effects at once, say, or the entire Dynamic family.
One thing the switches don’t tell you: the enabled transitions don’t all come up equally often. SlideFlow leans heavily on Cross Dissolve, uses the other calm ones regularly, and saves the eye-catching ones for punctuation—so a slideshow with everything switched on still feels calm rather than like a showreel of effects.
That’s worth knowing before you decide something isn’t working. With the whole catalog enabled, any one bold transition is genuinely rare: switch on Glitch and it may not turn up at all in a short slideshow, and that’s by design rather than a fault. If you want to see more of a particular one, switch some others off—the fewer you have enabled, the more often each of them comes round.
The same slideshow, never quite the same
A set doesn’t only vary the transitions within one playing. It varies them between playings: come back to the same slideshow tomorrow and the photo that dissolved last time slides instead, the wipe that opened it turns up halfway through, and the Glitch you never saw finally lands. Not one photo changed, and it still isn’t the run you already watched.
That’s at its most useful with Repeat slideshow turned on. A looping slideshow is background scenery—on a TV at a family gathering, or on a Mac during an event—and the trouble with background scenery is that people stop noticing it after the second loop, because they’ve already seen it. With a set of transitions enabled they haven’t: every pass moves differently from the one before.
It’s the same idea SlideFlow uses everywhere else, and the four sources of variation stack:
- Shuffle photos & videos changes the order.
- Filters change the look—and show you a familiar photo in a new style without saving an edited copy of it.
- Transitions change the movement.
- Shuffled music tracks change the sound.
Turn on all four and the same folder of photos never plays the same way twice—which is exactly what you want from a slideshow you leave running all evening, or come back to in six months.
Preview before you commit
Every transition in the list has a play button next to it, and the preview area at the top of the screen plays it on demand. Before the first preview it simply reads “Play transition to preview.”
Use it. Transition names are only roughly descriptive, and the difference between two effects in the same family is often something you have to see. Previewing one costs a second; discovering halfway through showing a slideshow to your family that you enabled something distracting costs rather more.
Once you’ve chosen, play the whole slideshow. SlideFlow generates slideshows on the fly, so playback starts almost immediately and you can judge the transitions in context—which is the only way to tell whether you’ve enabled too many.
Curate once in the Default Slideshow Settings, then trim per slideshow
Taste in transitions is personal, and almost everyone finds a few effects they simply don’t like—too flashy, too dated, too distracting. There’s no reason to keep meeting those again in every slideshow you make.
SlideFlow has three levels of settings, and transitions are worth setting at all three—each one narrower than the last:
- In the Default Slideshow Settings, pick a style and then switch off the ones you don’t like. That screen lives in SlideFlow’s own settings rather than in a slideshow. The style you choose there writes its set, and from that set you take away. Do it once. From then on, every new slideshow starts from your personal selection, and the ones you dislike never turn up in it. (The Style row will read Custom once you’ve edited the set—that’s expected: it means the selection is yours.)
- In an individual slideshow, switch off the ones that don’t suit this one. A wedding or a memorial slideshow might want nothing but Cross Dissolve, while your holiday recap keeps the full playful set—and neither choice changes what your next slideshow will do.
- On an individual photo or video, name one specific transition. Not a set this time but a single named effect, for the one moment that deserves its own entrance. The next section covers it.
The advantage of the first two is that you’re always narrowing down rather than building a selection from scratch, and a change of heart about one transition is a single switch in the Default Slideshow Settings instead of a decision you make again on every new slideshow.
One thing to be clear about: the Default Slideshow Settings are the starting point for slideshows you create from now on, not a master switch over the ones you already have. Slideshows you’ve already made keep the selection they were created with, so nothing you change here can disturb them—and by the same token, nothing you change here reaches into them either. If an existing slideshow still uses a transition you’ve gone off, switch it off in that slideshow’s own settings.
One specific transition for one specific moment
Sometimes a particular photo deserves a particular entrance: the first photo after a title card, the one image that changes the mood, the closing shot.
Open the settings for that individual item and you’ll find a Transition control. It starts at Slideshow (…), naming the slideshow’s current selection, which means this item follows the slideshow like everything else. Choose a specific transition instead and it’s used for that item alone.
Be clear about which direction it runs: a transition belongs to the item arriving, not the one leaving. Setting Circle Close on a photo means the photo before it irises out to reveal it—not that this photo closes into a circle once it’s done. So pick the transition on the item you want it to bring in.
This works on videos as well as photos. A video has fewer media settings than a photo—no duration or animation, since a clip brings its own—but Transition is one it does have, so a video can be eased in with a named effect exactly like a photo.
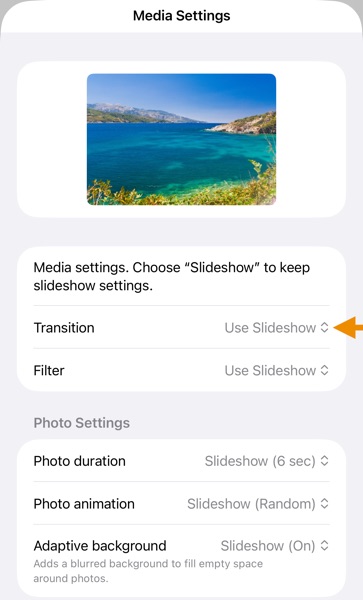
Note the difference between the two levels: at the slideshow level you enable a set and SlideFlow varies among them, while here you name exactly one. That’s the point—the media level is how you pin down a specific effect at a specific moment, rather than leaving it to chance.
If you change your mind, setting the control back to its Slideshow (…) value puts the item back to following the slideshow. There’s also Reset to Slideshow Settings at the bottom of the screen, which clears every override of that photo or video at once.
Transition on music beats
A transition decides how one photo gives way to the next. Transition on music beats, the switch right under Slide transitions, decides when: with it on, the change lands on a downbeat of the music rather than wherever the timer happens to run out. The difference is the one between a slideshow playing alongside its soundtrack and a slideshow playing to it—the thing that makes a music video feel edited rather than assembled.
What you get
Your Duration setting becomes approximate: each photo stays a little longer or shorter than the number you chose, so that the change into the next one lands on a beat. The Duration row says so while the switch is on: Adjusted to the nearest music beat. What lands on the beat is the moment you actually see the picture change—the cut itself, or the point where a transition hands over to the new photo—not the moment a transition begins.
The music is lined up too. The first track starts with the first photo rather than a moment before or after it, a new track tends to arrive together with a new photo, and after a video, which plays its full length, the next change still lands on the music.
What it needs
Music, first of all: the setting does nothing without it, and its footnote says so until you add tracks. And music with a beat: the timing follows a clear, steady pulse, and it is not guaranteed on every track. Calm, ambient, or free-flowing music may offer no beat to follow, and the slides then simply play at their set duration.
Beat timing works with SlideFlow’s built-in tracks on every Mac, iPhone, and iPad. With your own music—files from My Music or your Music app’s library—it needs macOS 27 or iOS 27. On earlier systems the footnote reads Only works with built-in tracks, and your own tracks play with the plain duration while the built-in ones stay on the beat.
Which transitions to use with it
How much beat timing matters depends on how sharp the change is—and the rule is simple: the shorter the transition, the more the timing counts. A change that happens in an instant is either on the beat or audibly off it; a change that takes two seconds is neither.
- Hard cuts need it most—with no transition at all, beat timing is essential. A cut on a fixed timer is the folder-of-images effect this guide opened with; the very same cut on the downbeat is how a music video is edited, and the result feels sharper and more alive than any transition could make it. When the timing is right, a hard cut isn’t the absence of a transition; sometimes it’s the better choice. Energetic and Happy Rhythm are built on exactly this: no transitions, cuts on the beat. To get it by hand, Deselect All and leave the beat switch on.
- Quick transitions—the 0.6-second impact cuts, Quick Dissolve, wipes and slides—gain almost as much. The hand-over is brief, and that brief moment landing on the beat is what makes a wipe feel like a flick of the wrist rather than a screensaver. Happy and Dramatic are built on these.
- Slow blends gain little. A two-second dissolve spreads the change over several beats, so there is nothing sharp to land, and calm music with little or no percussion has no pulse to land on anyway. Relax and Romantic leave the switch off for exactly this reason, and so does Gallery.
So if a slideshow doesn’t feel in step with its music, the fix is usually not more transition but less: shorten them, or drop them altogether, and let the beat do the work.
The duration matters too. Short, even durations—two to five seconds—keep the holds regular on the beat; an awkward one makes them visibly uneven. The styles’ durations are chosen with that in mind.
Beat timing and export
An exported video is rendered by the same engine, so the changes land on the beat there as well, with the usual caveat: shuffled tracks are resolved once at export, so the file keeps one particular alignment. Switch Shuffle tracks off first if the video should match what you previewed.
How many transitions should you use?
- Let a style decide — if you’d rather not decide at all. Each style enables a set that suits its mood, and the advice below is what to change from there.
- A personal or family slideshow you’ll loop — keep many enabled. Variety is the point, nobody is scrutinizing the craft, and every pass moves differently from the last.
- A wedding, tribute, or memorial slideshow — Cross Dissolve alone. Restraint reads as respect.
- A travel or holiday recap — a moderate set. A few dissolves and one or two wipes give it movement without turning it into a showreel of effects.
- A short, energetic clip for social media — dissolves for most of it, plus one or two from Dynamic or Effects. Their speed is what gives a quick recap its lift.
- Anything you’ll publish or share professionally — one or two. A small, consistent set reads as deliberate; a large one reads as default settings nobody bothered to change.
- A business or presentation slideshow — Cross Dissolve, and nothing else. The content is the point.
The general rule: the more serious the occasion, the fewer transitions. Variety is a feature of slideshows people watch repeatedly, and a liability in ones they watch once, closely.
Transitions, videos, and exported files
Transitions apply between every pair of items in the slideshow, including videos—so a clip is eased in the same way a photo is, rather than cutting in abruptly. The transition plays over a still of the clip’s first frame and the video starts moving the moment it completes; the item after it eases in from the clip’s last frame in the same way.
When you export your slideshow as a video, transitions are rendered into the file exactly as you saw them during playback—all but the very first one, for a reason covered just below. As with shuffling and filters, the variation is resolved at the moment you export: the file captures one particular run through your selection and keeps it.
The first transition, and why it matters for the thumbnail
The very first photo or video has nothing to transition from, so SlideFlow transitions it in from a black frame: the slideshow fades, wipes, or spins up out of darkness rather than starting on a picture that is simply there. On screen—on your Mac, your iPhone, or a TV—that’s almost always what you want. It reads as the slideshow beginning, the same way a film opens.
For an exported video, that same fade would be a drawback—which is why SlideFlow doesn’t render it. Photos, Finder, and most players take their thumbnail from the first frame, or from one very close to it, and the first frame of a video that fades in from black is black: a dark rectangle that tells nobody what the slideshow is. So on export, the first item’s transition is skipped. The exported file starts directly on your first photo or video, fully visible from frame one, and that picture is what players show as the thumbnail. Every other transition is rendered exactly as you saw it.
The two behaviors each live where they belong, with nothing to configure: playback on a screen opens out of darkness the way a film does, and an exported file opens on a picture worth a thumbnail. And if you’d rather playback opened on the photo too, the per-item control does it: open the settings for the first item and set its Transition to None.
The last transition, and how the slideshow ends
Every transition in this guide runs inward: it belongs to the item arriving, and it defines how that item comes in from whatever was on screen before it. The first item has nothing before it, so it comes in from black. Each of the rest comes in from the last frame of the one before.
Follow that rule to the final photo and a gap appears. Nothing arrives after it, so there is no item left to carry a transition—which is why the way a slideshow ends could never be a per-photo choice at all, however tempting it looks to set Circle Close on the last photo. It needs a setting of its own, and that’s Ending transition, the last row of General in the slideshow settings. It is the one transition that runs the other way: outward, from the last photo to black. The music fades out in step with it, so the picture and the sound finish together rather than both stopping.
Its choices are Fade Out (the default), Spin Out, Circle Close, and None. The first three all land on black; only the motion differs. It is no accident that two of them are the two transitions no style puts in its set: reading as an ending may be undesired in the middle of a slideshow and the whole point at the end of one.
It also runs slower than any transition between two slides—three seconds against 0.6 to 2. Between photos, lingering reads as sluggish; on the final frame it reads as deliberate, and it gives a piece of music the room it needs to finish.
You’ll see it whenever the slideshow reaches its end: with Repeat slideshow on, playback never does, so it doesn’t play—but an exported video always ends, so it is always there: it’s what makes an exported file close deliberately rather than simply stop.
More on the ending transition and every other slideshow setting →
A few tips
- Fewer usually looks better. If you remember the transitions afterwards instead of the photos, there were too many.
- Remember the transition against your photo duration. A transition is added to your photo duration rather than taken out of it. At the default five seconds per photo, a dissolve makes each slide seven seconds long—over a quarter of it transition—while a Flash adds about a tenth. Shorten the duration to two seconds and that same dissolve becomes half the slide, which is why the same effect feels far more prominent at a quick pace than a slow one, and why the fast styles use quick dissolves and cuts. If the transitions feel overbearing, lengthening the photo duration is often the better fix than disabling them.
- Factor transitions into the total length. They land on every photo, so a hundred-photo slideshow at the default five seconds each runs anywhere from a little over nine minutes to nearly twelve, depending on which transitions come up—and with beat timing on, each hold stretches or shrinks a little as well. Worth knowing before you export for somewhere with a time limit.
- Change one thing at a time. Transitions, animations, and pace all interact. If you change all three and it feels wrong, you won’t know which one did it.
- Preview on your own photos. A transition that looks great on a landscape can look messy between two busy group shots.
- Transitions and filters are separate decisions. Both are multi-select and both add variety—enabling everything in both at once is almost always too much.
(Note: New to SlideFlow? The step-by-step tutorials for Mac or iPhone and iPad walk you through your first slideshow in a few minutes. For every other setting, see customizing slideshow settings. More questions are answered in the SlideFlow FAQ).